|
Understanding Mailbox Aliases
Mail aliases are alternative addresses to existing mailboxes
on the same domain name. Messages sent to a mailbox alias arrive to the primary mailbox.
Creating Mailbox Aliases
To create a mailbox alias:
- Click New E-mail on the maildomain Controls page:

- On the configuration page, that you will be taken to, enter the mailbox
alias name in the Email address field.
- Check the Catch All box to intercept messages sent to a nonexistent account on the mail domain.
If catch all isn't enabled on any mail resource on this domain, such messages
will bounce back to the sender with an error notification.
- Check the box next to MAIL ALIAS.
- Click the name of the mailbox in the Click to choose from existing mailboxes list on the left
to assign the mailbox alias to it:
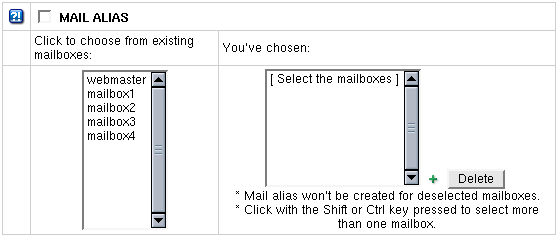
To assign a mailbox alias to more than one mailbox, click mailbox names in the
list with the Shift or Ctrl key pressed.
Chosen mailbox(es) will appear in the You've chosen: list on the right.
* Caution: the mailbox alias won't be created for the deselected mailboxes.
- Click the Submit button at the bottom of the form.
- Agree with charges, if any.
Editing Mailbox Aliases
You can change a mailbox alias or assign it to other mailbox(es) or do both. To edit a mailbox alias:
- Click the mailbox alias e-mail address in the E-mail list on the maildomain Controls page:

- Perform steps 5 to 7 of the create mailbox aliases procedure.
Unassigning Mailbox Alias from Mailbox(es) It is Currently Assigned to
To unassign a mailbox alias from the mailbox(es) it is currently assigned to:
- Click the mailbox alias e-mail address in the E-mail list on the maildomain Controls page
as you do when changing mailbox aliases.
- Select the mailbox name it is currently assigned to in the left You've chosen: mailbox list.
- Press the Delete button next to the list.
To remove several mailboxes from the You've chosen: mailbox list on the left,
select the mailboxes names in the list with the Shift or Ctrl key pressed and click the Delete button.
Removing Mailbox Aliases
To remove a mailbox alias preserving other services running on it's e-mail address:
- Click the mailbox alias e-mail address in the E-mail list on the maildomain Controls page
as you do on the first step of Changing Mailbox Aliases guide.
- Uncheck the MAIL ALIAS box.
- Click the Submit button at the bottom of the form.
To remove a mailbox alias along with all mail services running it's e-mail address,
click the Delete icon in the mailbox alias Properties column on the Mail Controls page:

To delete a Catch All mailbox alias, first switch Catch All OFF.
|