|
Starting with version 3.0, H-Sphere implements Dedicated Application Pool
for users of Windows 2003 platform. IIS 6.0 provides the ability to configure
applications to run in the dedicated application mode. This means one or more
web applications can be grouped together into so-called pools and run in isolation
from others, assigned to other web application pools. Because each application pool
runs in its own worker process, errors in one application pool will not affect
the applications running in other application pools.
All newly created resources that use application pools are by default created in
an appropriate Shared Application Pool. There are four predefined shared pools:
3 pools for each version of .NET framework and one general shared application pool
which contains non-ASP.NET applications.
When a web application is being created under a dedicated application pool,
the pool should exist prior to its creation. Now H-Sphere allows you,
right from your user control panel, to create web directories and assign web applications to them,
in the same time choosing a dedicated or a shared pool for each application.
This document will tell you how to configure
Dedicated Application Pools, Web Directories
and Web Applications.
Dedicated Application Pool
To add a Dedicated Application Pool:
In Windows 2003
- Go to Account -> Account Settings in your user CP.
- In the section Dedicated Application Pool, click Add
- Enter extension and maximum number of worker processes:

- Extension will be used for pool name. For instance, if your account name is user,
extension is test, the newly-created application pool will be named usertestAppPool.
- In H-Sphere 3.0 Patch 7+ the Maximum number of worker processes can be restricted by Admin.
In Windows 2000: Dedicated Application Pool is not available.
Web Directory
To add a Web Directory:
- Go to Domain Info - > WebService
- Go to Web Directories Settings.
- Click the Add button to create a new web directory
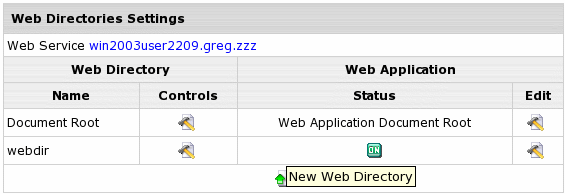
- Fill in the form for your new directory and click Submit.
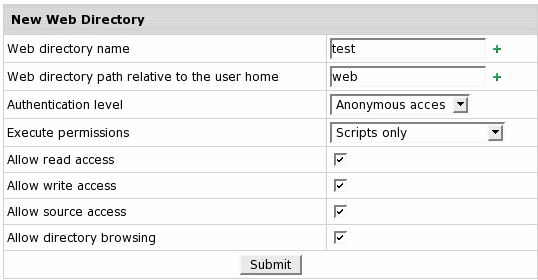
Where:
- Enter Web directory name and Web directory path relative to the user home
- Authentication level - choose between Anonymous Access and Protected Access.
Anonymous access gives access to the public areas of your Web or FTP site without prompting
visitors for a user name or password. Protected authentication gives users
access to the resources prompting them for a user name or password.
- Execute permissions option determines the program execution level allowed
for this site's resources: None restricts access only to static files such as
HTML or image files, Scripts only allows only scripts to run, not executables
and Scripts and Executables removes all restrictions so that all file types
can be accessed or executed.
- Allow read access - check the box to allow users to read or
download files or directories and their associated properties.
- Allow write access - check the box to allow users to upload files and
their associated properties to the enabled directory on your server or to change
content in a Write-enabled file. Write access is allowed only with a browser
that supports the PUT feature of the HTTP 1.1 protocol standard.
- Allow source access - select to allow users to access source code if either
Read or Write permissions are set. Source code includes scripts in ASP applications.
- Allow directory browsing - select to allow users to see a hypertext listing of the files
and subdirectories in this web directory.
- Confugure web directory resources.
To do this, go to the Web Service page for this domain,
choose the needed directory in the Web Directories and Web Applications
section and click Go. Page similar to this appears:
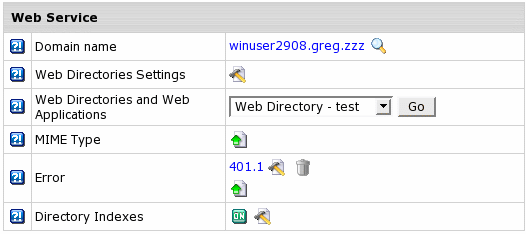
Resources available for the web directory are MIME Type,
Error page and
Directory Indexes.
You can edit and delete web directories, except for the predefined
Document Root directory which can't be deleted.
Web Application
To assign a Web Application to a web directory:
- Go to the Web Service page for this domain and click Edit next to Web Directories Settings.
- On the page that appears, click to enable Web Application for the chosen Web Directory:
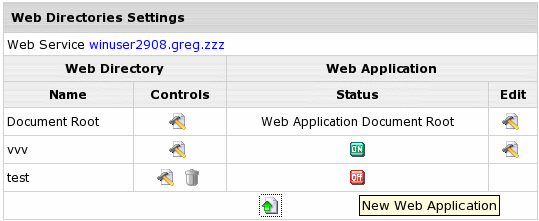
- In Windows 2003: Choose Application Pool from the drop-down box and click Submit:

- Configure web directory resources.
To do this, go to the Web Service page for this domain
and click Edit next to Web Directories Settings:
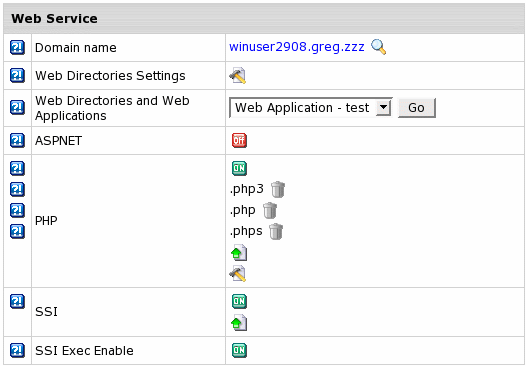
Resources available for the web application are PHP,
ASP.NET and
SSI.
You can edit and delete web applications.
Note: Applications with different versions of ASP.NET enabled cannot run
in the same application pool, either dedicated or shared. Changing ASP.NET version
for an application from a shared pool will automatically move it to another predefined
shared pool. H-Sphere will not allow you to change ASP.NET version to, for instance,
1.1 if the application is run in a dedicated pool which has other applications with ASP.NET 2.0.
|