|
To configure your Eudora or any other e-mail client, you need to know
your POP3 and SMTP servers. To find them out:
- Log into H-Sphere control panel;
- Select Mail Info in the Mail Info menu.
Your provider's mail server may use different SMTP relays for sending mail
- POP before SMTP or SMTP AUTH.
In POP before SMTP, the relay system collects your IP address when you authenticate yourself
with the POP server, and then permits SMTP relaying from that IP address for a short period of time.
In other words, if your server uses POP before SMTP, you need to check your mail first, only then you
can send your messages. If your mail servers uses SMTP AUTH,
you must configure your Eudora to send a login and password not only when you receive mail,
but also when you send it. Ask your provider which relay the server uses.
- Configuring Eudora with POP before SMTP relay.
- Configuring with SMTP Auth relay.
Configuring Eudora
To configure this email client with the POP before SMTP relay:
- Open Eudora.
- In the menu bar, go to the Tools drop-down menu and select Options.
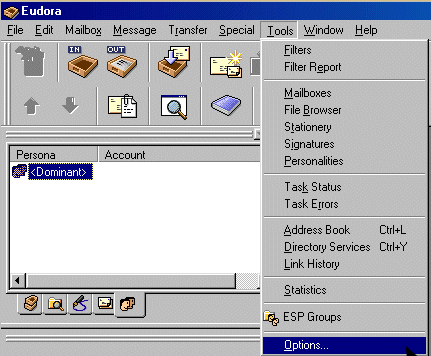
- On the page that shows, select Getting Started on the left and fill in the following form:
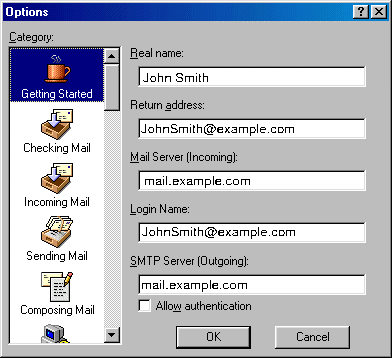
<
- Real name - enter the name you would like others to see when they receive your e-mail;
- Return address - your full e-mail address;
- Mail Server - your incoming mail server;
- Login Name - your e-mail address;
- SMTP Server - your outgoing mail server.
Click OK. Once you have filled these fields,
Eudora will populate other settings based on your input.
- Select Checking Mail on the left and fill out the form that shows:
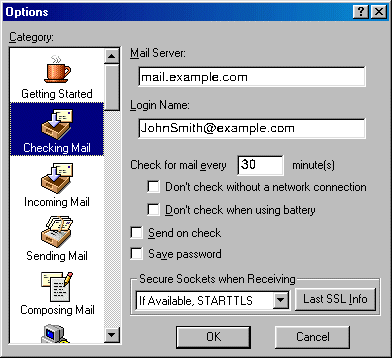
- Mail Server (POP) and Login Name should be populated
from your input on the Getting Started screen.
- Check for mail every "X" minutes - determine how often Eudora
will check for new mail messages when you are connected.
- Send on check - allows you to send any outgoing mail messages
at the time that you check for incoming mail.
- Save password - check this option so you will not have to enter
it each time you check your mail.
Click OK to save settings.
- Select Incoming Mail on the left and check the necessary options:
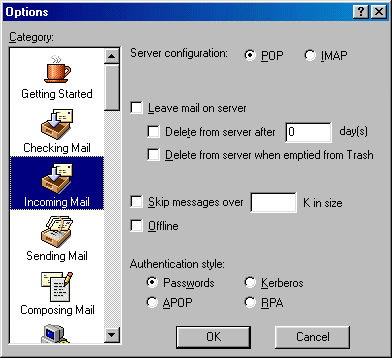
- Server Configuration - must be set to POP;
- Leave mail on server - allows your e-mail to be stored on a server;
Otherwise, mail can be deleted after storing for a certain amount of days or
upon emptying from Eudora's Trash bin;
- Skip messages - allows you to not download messages that are of a large size;
- Offline should not be checked;
- Authentication style should be set to Passwords.
Click OK.
- Select Sending Mail on the left.
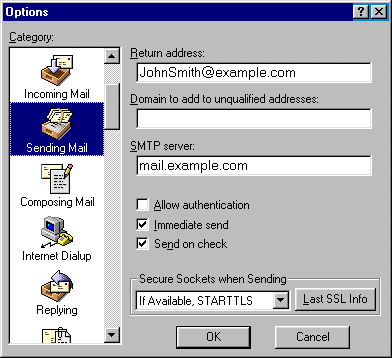
- Return address and SMTP server should already be completed
from previous fields on the Getting Started tab;
- Domain field can be left blank;
- Allow authentication should not be checked for POP SMTP relay;
- Immediate send allows Eudora to send messages immediately after being written,
as opposed to storing them in the Outbox for you to send at a later time;
- Check Send on check to send any outgoing mail messages at the time that
you check for incoming mail;
- Leave Secure Sockets as the default setting;
Click OK to save settings.
Configuring Eudora with SMTP Auth Relay
To set SMTP Auth, do the following:
- Repeat steps 1-6 as described above.
- In addition to settings on step 6, check the Allow authentication box.
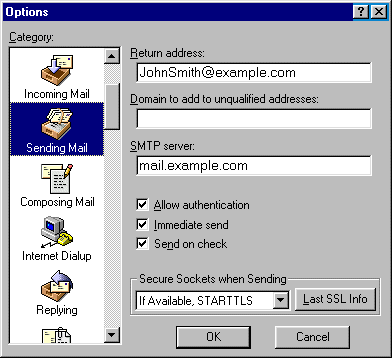
- Click OK.
Now that Eudora Mail is configured, you can send and receive emails.
|