|
This document covers the following topics:
Removing Domains
To remove a domain, do the following:
- Select Domain Info link in Domain Settings menu on the left.
- Click the Delete icon in the Domain name field at the top of the page.
- Confirm the deletion by clicking "Yes, I agree with the above".
- Choose whether you would like to preserve the content of the domain's directory.

- If you choose to leave web content, all this website will remain on the server
and will be accessible by FTP.
- If you choose to remove web content, all this website
and it's directory will be permanently deleted from the server.
Instant Domain Aliases
An instant domain alias is an additional web address that gives access to
your website when you don't have a real domain name or when your real domain
name is temporarily unavailable. Instant domain aliases are generated
randomly based on your provider's domain name and can't be changed. To enable or
disable access to your website by instant domain alias:
- Select Quick Access in Account menu.
- Click the Web Options icon to go to your web options page.
- Select the domain if you have more than one.
- Click Edit next to Web Service.
- At the bottom of the Web Service page that appears,
enable or disable Instant access domain alias.
Creating Subdomains
A subdomain is a lower level domain. It is added on the left
of the domain name, e.g. subdomain.example.com.
You can create as many
subdomains as allowed by the plan. Domains and subdomains
have equal functional capabilities, including web site management,
e-mail service, FTP, dedicated IPs, etc., but subdomains do not have their
own DNS zones and usually cost less.
To create a subdomain, go through the following steps:
- Select Domain Info link in Domain Settings menu in user's Control Panel.
- Click Add in the Sub Domains field. You
will be asked to enter the subdomain name:

- Enter the new subdomain. It will be displayed in the Subdomain
field of the Domain Settings page.
Shared and Dedicated IP Hosting
This is also called Virtual Hosting (Shared IP) and
IP Based Hosting (Dedicated IP).
- Shared IP hosting - one IP address is assigned to several domains
and access to a domain is available only by its domain name;
- Dedicated IP hosting - one IP address is assigned to one domain.
To access a domain you can use either its IP address or its domain name.
| IP Hosting |
Advantages |
Disadvantages |
Shared IP |
- can be used for virtually unlimited number of virtual hosts;
- easy to configure and use;
- requires no additional hardware of software;
- can be used for free.
|
- does not support Virtual FTP;
- does not support SSL protection.
|
Dedicated IP |
- supports Virtual FTP
- supports SSL
|
|
Switching from Dedicated IP to Shared IP will delete your
virtual FTP and SSL services.
To change the type of IP, do the following:
- Select Domain Info in the Domain Settings menu.
- If you have several domains, choose the one to enable virtual FTP for.
- Click Change to Shared IP in the IP Address field:

- If prompted, confirm the change by clicking "Yes, I agree with the above".
IMPORTANT: After you switch between shared and dedicated
IPs, it will take several hours before the domain becomes
available at the new IP address.
Domains on dedicated IPs don't have instant access aliases.
You can use an IP-only server. To create it, choose "no
domain" during signup. Following the signup, you
should change IP to Dedicated.
Domain Aliasing
Domain aliasing is creating domain names that point to other domains.
For example, if your domain name is example.com, you
can register another domain name, e.g. example.net
and have it point to the location of example.com. This
means, every Internet user who goes to example.net
will land in example.com.
A domain alias may have:
- its own DNS zone;
- custom DNS records;
- separate mail service.
To create a new domain alias, do the following:
- Register the alias, exactly as you
register domain names.
- Select Domain Info link in Domain Settings menu.
- Click the Add icon in the Domain Aliases
field at the bottom of the page.
- Confirm by clicking "Yes, I agree with the additional charges".
- Enter the domain alias. This must be a fully qualified
domain name, e.g. example.com:

- leave the Create DNS zone box unchecked if the domain alias
is registered on a different DNS server. In this case, DNS
for this domain alias will not be maintained and mail service
will be inaccessible for this domain alias.
- check the Create DNS zone box if you want a DNS record
for this domain alias to be created on this hosting server.
In this case you'll be able to create and edit custom DNS records
for this domain alias, and Mail Service will
be available.
- check the New Mail Domain Alias box if you want a mail domain alias to be created right away.
In this case mail resources on a mail domain will all have alternative addresses with
different domain parts and the same resource names. If you leave the box unchecked,
you may create a mail domain alias using Mail Manager later.
H-Sphere 3.1 Beta 1 introduces new concept of domain aliasing. Now H-Sphere treats domain aliases as
full-featured domains. It means that they can be registered/renewed via domain registrar right from your CP. Besides, domain
aliases can be easily turned to full-featured hosting domains and vice versa.
This concept provides you with more flexible approach to creating web hosting/mail service aliases. You can:
Currently, H-Sphere supports hosting/mail service alias for the following
types of domains:
| Hosting Domain Alias |
Mail Service Alias |
domain of Host Existing Site type
Registered domain
Transferred domain
|
domain of Host Existing Site type
Registered domain
Transferred domain
|
If you have domain aliases added before version 3.1, they will continue to operate
according to the old scheme. To make old aliases full-featured domains, remove them and then add again as described below.
Configuring new domain as a web hosting/mail service alias for an existing domain
To do this:
- Choose Add New Domain in Domain Settings menu.
- Enter name for your alias and click Submit:

- Click Continue. Then on the Options page choose settings exactly as shown on the below screenshot. Click
Submit.
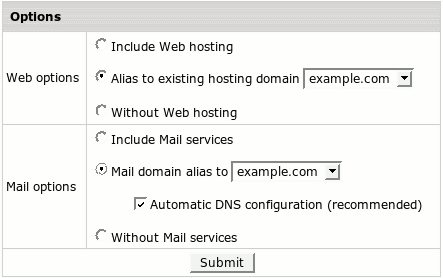
Disabling web hosting/mail service alias for a domain
To do this:
- Go to Edit Domain page:
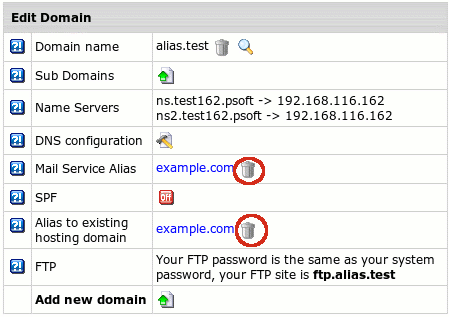
- Click the Trash icon near Mail Service Alias/Alias to existing hosting domain.
Turning domain/mail service alias to full-featured web/mail hosting domain
To do this:
- Go to Edit Domain page.
- Click the Trash icon near Mail Service Alias/Alias to existing hosting domain as in the above subsection.
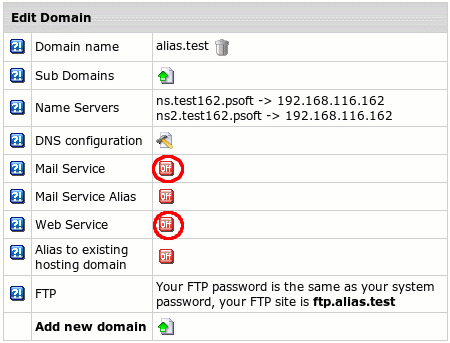
- Click the Off icon near Mail Service/Web Service:
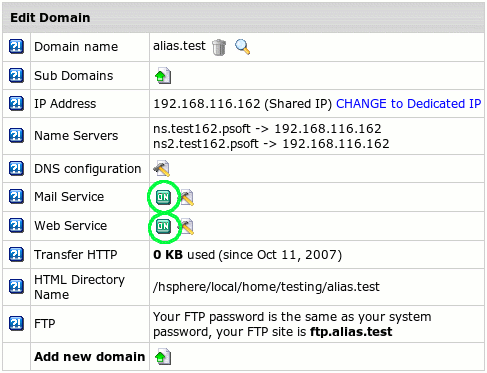
- Mail/Web Service will become enabled:
Registering domains without web/mail service to be considered later either for hosting or for aliasing
To do this:
- Choose Add New Domain in Domain Settings menu.
- Enter name for your domain and click Submit.
- Click Continue and on the Options page choose settings exactly as shown on the below screenshot. Click
Submit.
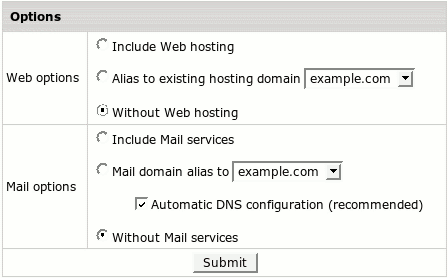
- Later on the Edit Domain page turn on either the Service buttons or the Alias buttons.
Server Aliasing
Server aliases are additional names for your virtual host.
Unlike domain aliases, they are not added to your DNS zone, and
are registered only with Apache. For instance, if your virtual
host name is example.com and you also would like it to
be available at www.example.com, you should add www
server alias to the example.com domain.
To add a server alias, do the following:
- Select Quick Access in Account menu.
- Click the Web Options icon to go to your
web options page.
- Click the Edit icon next to the domain you need.
- Scroll down to the Server alias field and click the
Add icon.
- Enter server alias. It will be added to the list of server
aliases for this virtual host name.

Renewing Domain Registration
This option is available only for domains registered from your control panel.
Although you will be sent an e-mail notification before
your domain expires, you can choose whether to renew your contract with the registrar company
manually or automatically. In the automatic mode, your domain name will be renewed for as many
years as you specify in your control panel settings. In the manual mode, you would have to
enter your control panel and click the Renew Domain link; otherwise the domain name will
expire and become unavailable. To set the renewal mode to automatic or manual:
- Select Quick Access in Account menu.
- Click the Domains icon.
- Select the domain name if you have more than one.
- The active mode shows up in the Domain renew mode entry:

To switch to another mode, click the Edit icon.
- On the page that opens, select either Manual or Automatic.
To renew domain registration manually:
- Click the Renew domain link:
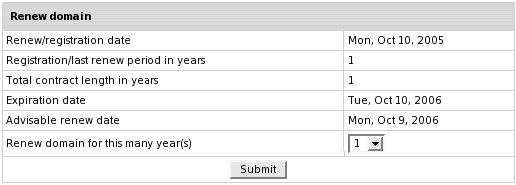
- Renew/registration date: the date you registered your domain or last time
renewed the domain registration.
- Registration/last renew period in years: the period you registered or last time
renewed the domain registration for.
- Total contract length in years: the period you've registered
your domain for (including all the renewals).
- Expiration date: the date when your domain registration period expires.
- Advisable renew date: the date you are advised to renew the domain registration.
- Renew domain for this many year(s): set the period you'd like to renew
the domain registration for.
- Click the Submit button, to confirm your renewal request.
To configure automatic renewal:
- Click the Edit icon next to Domain renew mode.
- Select Automatic and enter the years to renew the domain for:

Changing Contact/Billing Info for Domains Registered through the Control Panel
Contact/billing info is available only for domains registered through CP.
If you want to change either your contact or billing info for a registered domain,
click the Edit icon in the corresponding section. Edit info in the form and check Yes
in the Affect Owner Info entry:

Note: If your .org domain is locked, you won't be able to update your domain's contact/billing information
via CP! Unlock your domain first!
|